Difference between revisions of "Add Headings"
***** (***** | *****) m |
***** (***** | *****) m |
||
| (7 intermediate revisions by 3 users not shown) | |||
| Line 1: | Line 1: | ||
| + | {{Back to Help Portal}} | ||
| + | = Add Headings = | ||
| − | |||
| − | |||
| − | |||
| − | |||
| − | |||
| − | |||
| − | |||
| − | |||
<br/> | <br/> | ||
| Line 19: | Line 13: | ||
1. Highlight the words to create a heading. | 1. Highlight the words to create a heading. | ||
| − | |||
| − | + | [[File:Capture d’écran 2021-09-15 à 09.16.06.png|700x700px|alt=]]<div style="clear: both"> | |
| − | <div style="clear: both"></div> | + | </div> |
| − | 2. Click on the option "Paragraph | + | 2. Click on the option "Paragraph" in the toolbar and choose the desired heading format. Headings follow a hierarchy format with "'''Heading'''" the largest and "'''Sub-heading 4"''' the smallest. Please make sure that the first letter of the main words are always capitalised. |
| + | |||
| + | |||
| + | [[File:Capture d’écran 2021-09-15 à 09.17.08.png|700x700px|alt=]] | ||
| + | |||
| − | |||
| − | |||
| − | |||
3. The heading will now appear with a predefined font and size. | 3. The heading will now appear with a predefined font and size. | ||
| − | '''Note''': If you choose any heading formats from | + | '''Note''': If you choose any heading formats from "'''Heading to Sub-heading 4"''', a line will be inserted automatically between the heading and the body text. However, if you choose paragraph, no line will be added. |
| − | [[File: | + | |
| − | <div style="clear: both"></div> | + | |
| + | [[File:Capture d’écran 2021-09-15 à 09.17.42.png|700x700px|alt=]]<div style="clear: both"></div> | ||
4. If there are more than three headings, a Table of Content is automatically generated. | 4. If there are more than three headings, a Table of Content is automatically generated. | ||
| − | |||
| − | |||
| − | |||
| − | + | [[File:Capture d’écran 2021-09-15 à 09.18.30.png]] | |
| − | + | <div style="clear: both"> | |
| + | |||
| + | |||
| + | </div> | ||
| + | '''Advanced - using the "Source editing" option:''' | ||
| − | < | + | *If you want to show the Table of Content regardless of the number of headings, you can put the magic keyword "<nowiki>__FORCETOC__</nowiki>" anywhere on the page and a Table of Content will appear. |
| + | *Conversely, the magic keyword "<nowiki>__NOTOC__</nowiki>" will suppress the Table of Contents if placed anywhere within the page.<br /> | ||
{{Help Magic Words}} | {{Help Magic Words}} | ||
[[Category:Help]] | [[Category:Help]] | ||
Latest revision as of 15:21, 28 April 2023
Add Headings
Instructions
An Article can and should be divided into different sections/headings to break up the text and organise the content. If a page has more than three sections, a "Table of Content (TOC)" is automatically generated. The first letter of the main words in the headings should always be capitalised. For example, instead of writing "further information", please write "Further Information".
To add headings:
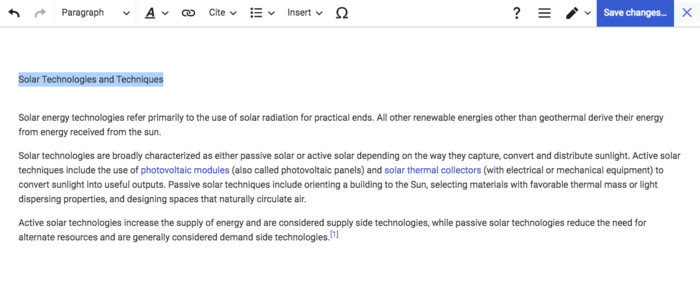
1. Highlight the words to create a heading.
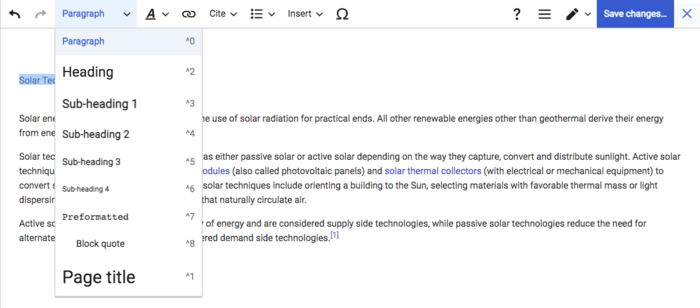
2. Click on the option "Paragraph" in the toolbar and choose the desired heading format. Headings follow a hierarchy format with "Heading" the largest and "Sub-heading 4" the smallest. Please make sure that the first letter of the main words are always capitalised.
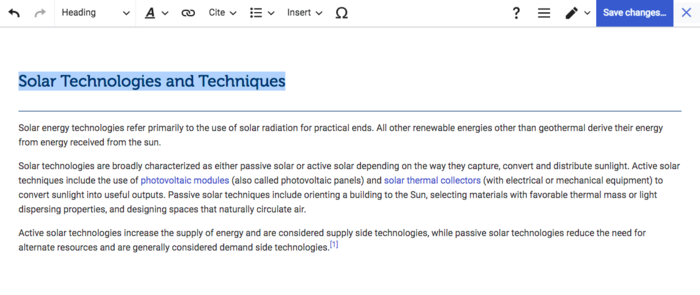
3. The heading will now appear with a predefined font and size.
Note: If you choose any heading formats from "Heading to Sub-heading 4", a line will be inserted automatically between the heading and the body text. However, if you choose paragraph, no line will be added.
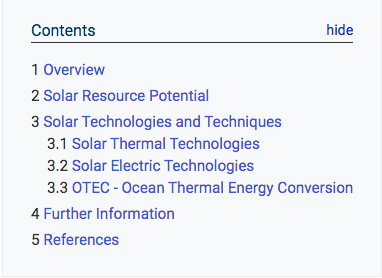
4. If there are more than three headings, a Table of Content is automatically generated.
Advanced - using the "Source editing" option:
- If you want to show the Table of Content regardless of the number of headings, you can put the magic keyword "__FORCETOC__" anywhere on the page and a Table of Content will appear.
- Conversely, the magic keyword "__NOTOC__" will suppress the Table of Contents if placed anywhere within the page.


