Difference between revisions of "Insert a Video"
***** (***** | *****) (Created page with "{{template:Tabs-1 |Energypedia_Community:_Help|Back to the Help Portal | }}<br/> = Video = {{#widget:YouTube|id=bnYalSk5VQg|height=300|width=400}} <br/> == Instructions ==...") |
***** (***** | *****) m Tag: 2017 source edit |
||
| (7 intermediate revisions by one other user not shown) | |||
| Line 1: | Line 1: | ||
| − | {{ | + | {{Back to Help Portal}} |
| − | |||
| − | |||
| − | }} | ||
| − | = Video = | + | = Insert a Video = |
| − | {{#widget:YouTube|id=bnYalSk5VQg|height=300|width= | + | <!--{{#widget:YouTube|id=bnYalSk5VQg|height=300|width=600}}--> |
| − | |||
| − | |||
== Instructions == | == Instructions == | ||
| − | Before embedding any videos, the video must be uploaded to | + | Before embedding any videos, the video must be uploaded to YouTube. |
1. To insert a video, go to the relevant article and click on edit to open the article in edit mode. | 1. To insert a video, go to the relevant article and click on edit to open the article in edit mode. | ||
| Line 21: | Line 16: | ||
[[File:Insert a video.png|border|left|700pxpx]] | [[File:Insert a video.png|border|left|700pxpx]] | ||
| − | + | <div style="clear: both"></div> | |
4. A pop of menu will menu. For the option "'''Choose video provider'''", choose the relevant video hosting site. For the option "'''Insert video ID'''", copy the relevant video id. For example, a video hosted on YouTube will have a URL: [https://www.youtube.com/watch?v=bnYalSk5VQg https://www.youtube.com/watch?v=bnYalSk5VQg] and the video id is '''"bnYalSk5VQg" '''(everything after the equal to sign in the URL). | 4. A pop of menu will menu. For the option "'''Choose video provider'''", choose the relevant video hosting site. For the option "'''Insert video ID'''", copy the relevant video id. For example, a video hosted on YouTube will have a URL: [https://www.youtube.com/watch?v=bnYalSk5VQg https://www.youtube.com/watch?v=bnYalSk5VQg] and the video id is '''"bnYalSk5VQg" '''(everything after the equal to sign in the URL). | ||
[[File:Insert a video2.png|border|left|400pxpx]] | [[File:Insert a video2.png|border|left|400pxpx]] | ||
| − | + | <div style="clear: both"></div> | |
5. Click on "save page" to insert the video. Congratulations! You have now successfully added video to your article! | 5. Click on "save page" to insert the video. Congratulations! You have now successfully added video to your article! | ||
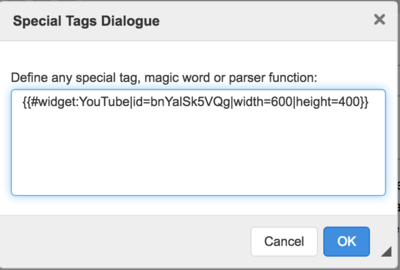
| − | 6. To change the width/height of the embedded video, edit the article and click on the video icon. A pop of menu will appear. Add the width and height as shown in the image below | + | 6. To change the width/height of the embedded video, edit the article and click on the video icon. A pop of menu will appear. Add the width and height as shown in the image below. Save the article to save your changes. |
[[File:Insert a video3.png|border|left|400pxpx]] | [[File:Insert a video3.png|border|left|400pxpx]] | ||
| − | + | <div style="clear: both"></div> | |
<br/> | <br/> | ||
{{Help Magic Words}} | {{Help Magic Words}} | ||
| + | |||
| + | [[Category:Help]] | ||
Latest revision as of 11:09, 11 July 2024
Insert a Video
Instructions
Before embedding any videos, the video must be uploaded to YouTube.
1. To insert a video, go to the relevant article and click on edit to open the article in edit mode.
2. Move your cursor to the place where you want to insert the video.
3. Click on "Insert Video" option in the toolbar.
4. A pop of menu will menu. For the option "Choose video provider", choose the relevant video hosting site. For the option "Insert video ID", copy the relevant video id. For example, a video hosted on YouTube will have a URL: https://www.youtube.com/watch?v=bnYalSk5VQg and the video id is "bnYalSk5VQg" (everything after the equal to sign in the URL).
5. Click on "save page" to insert the video. Congratulations! You have now successfully added video to your article!
6. To change the width/height of the embedded video, edit the article and click on the video icon. A pop of menu will appear. Add the width and height as shown in the image below. Save the article to save your changes.


