Difference between revisions of "Insert Tables"
From energypedia
***** (***** | *****) m |
***** (***** | *****) m Tag: 2017 source edit |
||
| (12 intermediate revisions by 3 users not shown) | |||
| Line 1: | Line 1: | ||
| − | {{ | + | {{Back to Help Portal}} |
| − | |||
| − | |||
| − | }} | ||
| − | + | = Insert Tables = | |
== Instructions == | == Instructions == | ||
| − | 1. Click on | + | 1. Click on "Insert" in the edit toolbar and on "Table".<br/> |
| − | [[File: | + | [[File:Capture d’écran 2021-09-15 à 14.54.25.png]]<div style="clear: both"></div> |
| − | <div style="clear: both"></div> | ||
3. Choose your desired table properties.<br/> | 3. Choose your desired table properties.<br/> | ||
| + | |||
| + | [[File:Capture d’écran 2021-09-15 à 15.12.43.png|300x300px]][[File:Capture d’écran 2021-09-15 à 15.12.54.png|300x300px]] | ||
| + | |||
{| style="width:100%" | {| style="width:100%" | ||
|- | |- | ||
| − | + | | style="width: 527px" | | |
| − | | style="width: 527px | ||
*Enter the number of "Rows" and "Columns" you need. | *Enter the number of "Rows" and "Columns" you need. | ||
*The option “Border size“ allows you to specify the width of the table border. If the border size is "0" or empty, the table will not have any border. | *The option “Border size“ allows you to specify the width of the table border. If the border size is "0" or empty, the table will not have any border. | ||
*You can enter a title in the caption field that will be shown on the top of the table. | *You can enter a title in the caption field that will be shown on the top of the table. | ||
| − | *width describes the tables width.It is advisable to choose "Width"=100% | + | *width describes the tables width.It is advisable to choose '''"Width"=100% '''. Then the table will automatically align itself to the article width and the article will not be skewed. |
| − | *Cell spacing describes the space between the cells in the tables in pixels<br/> | + | *Cell spacing describes the space between the cells in the tables in pixels<br /> |
*Cell padding describes the space between the cells' borders and the text inside them | *Cell padding describes the space between the cells' borders and the text inside them | ||
| Line 31: | Line 29: | ||
4. Click "OK" and the table will be displayed.<br/> | 4. Click "OK" and the table will be displayed.<br/> | ||
| − | {| cellspacing="1" cellpadding="5" border="1" align="left | + | {| style="width: 762px" cellspacing="1" cellpadding="5" border="1" align="left" |
|+ Example of a table | |+ Example of a table | ||
|- | |- | ||
| | | | ||
| − | | style="width: 369px | + | | style="width: 369px" | <br/> |
|- | |- | ||
| <br/> | | <br/> | ||
| − | | style="width: 369px | + | | style="width: 369px" | <br/> |
|- | |- | ||
| <br/> | | <br/> | ||
| − | | style="width: 369px | + | | style="width: 369px" | <br/> |
|} | |} | ||
| Line 56: | Line 54: | ||
= Changing the Table Properties<br/> = | = Changing the Table Properties<br/> = | ||
| − | Right click on the table to get the following options. | + | Right click on the table to get the following options. |
| − | [[File: | + | |
| − | <br/> | + | |
| + | [[File:Capture d’écran 2021-09-15 à 15.16.19.png|400x400px]] | ||
| + | |||
| + | <br /><br /> | ||
<u>For example:</u> | <u>For example:</u> | ||
| Line 67: | Line 68: | ||
*Change basic table properties: Click “Table properties“.<br/> | *Change basic table properties: Click “Table properties“.<br/> | ||
| − | |||
'''"Advance Option"'''<br/> | '''"Advance Option"'''<br/> | ||
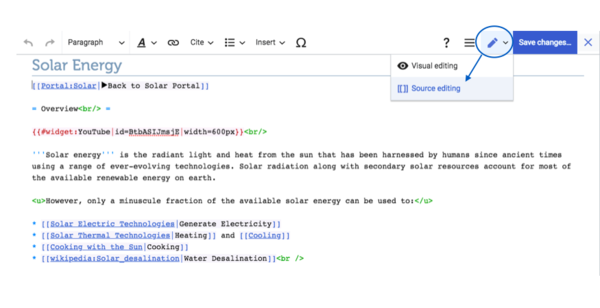
You can of course also create a table in the wiki text but this is not that easy. However, once you know what you are doing it is a comfortable tool for editing tables. | You can of course also create a table in the wiki text but this is not that easy. However, once you know what you are doing it is a comfortable tool for editing tables. | ||
| − | [[File: | + | |
| + | |||
| + | [[File:Capture d’écran 2021-09-15 à 09.59.33.png|600x600px]]<div style="clear: both"></div> | ||
<br/> | <br/> | ||
| − | If you are interested, see [ | + | If you are interested, see [https://en.wikipedia.org/wiki/Help:Introduction_to_tables_with_Wiki_Markup/1 here] or just create one with the editor and see what changes in WikiText result in.<br/> |
Some basic explanations: | Some basic explanations: | ||
| Line 87: | Line 89: | ||
= Import Tables from Excel<br/> = | = Import Tables from Excel<br/> = | ||
| − | It is also possible to import existing Excel tables into energypedia. Here, you can find a detailed description of the [[ | + | It is also possible to import existing Excel tables into energypedia. Here, you can find a detailed description of the [[Import Tables from Excel|Excel to wiki import]]. |
| + | |||
| + | {{Help Magic Words}} | ||
| + | [[category:Help]] | ||
Latest revision as of 06:40, 1 December 2021
Insert Tables
Instructions
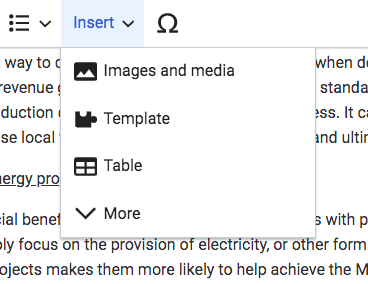
1. Click on "Insert" in the edit toolbar and on "Table".
3. Choose your desired table properties.
|
4. Click "OK" and the table will be displayed.
Changing the Table Properties
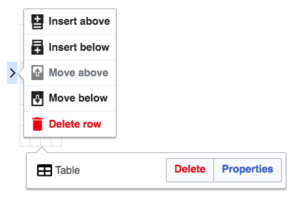
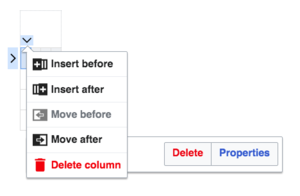
Right click on the table to get the following options.
For example:
- Delete or insert cells, rows and columns etc.
- "Merge Right" (or left) to merge two cells to one.
- Change the colour of a cell: "Cell" -> "Cell Properties" -> "Background Colour"
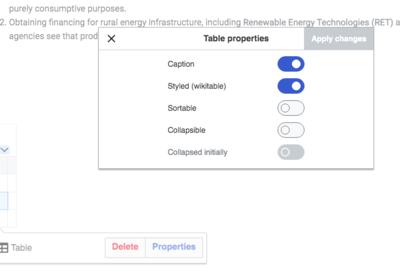
- Change basic table properties: Click “Table properties“.
"Advance Option"
You can of course also create a table in the wiki text but this is not that easy. However, once you know what you are doing it is a comfortable tool for editing tables.
If you are interested, see here or just create one with the editor and see what changes in WikiText result in.
Some basic explanations:
- Cellspacing describes the space between the cells in the tables in pixels
- Cellpadding describes the space between the cells' borders and the text inside them
- Width describes the tables width. Note that it is possible to give cells a specific width which will be used for all the cells in a column.
Import Tables from Excel
It is also possible to import existing Excel tables into energypedia. Here, you can find a detailed description of the Excel to wiki import.

