Difference between revisions of "Download an Article"
***** (***** | *****) m |
***** (***** | *****) m |
||
| Line 5: | Line 5: | ||
1. To start the book creator, click on "Print/export" in the left sidebar. In the drop down menu which opens up, click on "create a book". The following page will appear: | 1. To start the book creator, click on "Print/export" in the left sidebar. In the drop down menu which opens up, click on "create a book". The following page will appear: | ||
| + | |||
| + | <br/> | ||
[[File:Book creator.png|left|180px|Book Creator.jpg|alt=Book Creator.jpg]] | [[File:Book creator.png|left|180px|Book Creator.jpg|alt=Book Creator.jpg]] | ||
| Line 21: | Line 23: | ||
3. Now you can browse through energypedia.info and whenever you find an article that you want to add to your book, click on "Add this page to your book" in the book creator box at the top of the page. If you accidentally added an article to your book, you can remove it by clicking "remove this page from my book" in the box at the top of the page. | 3. Now you can browse through energypedia.info and whenever you find an article that you want to add to your book, click on "Add this page to your book" in the book creator box at the top of the page. If you accidentally added an article to your book, you can remove it by clicking "remove this page from my book" in the box at the top of the page. | ||
| + | |||
| + | <br/> | ||
[[File:Book Creator3.jpg|left|750px|Book Creator3.jpg|alt=Book Creator3.jpg]] | [[File:Book Creator3.jpg|left|750px|Book Creator3.jpg|alt=Book Creator3.jpg]] | ||
| Line 27: | Line 31: | ||
4. Once you have chosen all the pages you want to add to your book, click on "show book" in the box at the top of the page. The following page opens: | 4. Once you have chosen all the pages you want to add to your book, click on "show book" in the box at the top of the page. The following page opens: | ||
| + | |||
| + | <br/> | ||
[[File:Book Creator Manager (1).jpg|left|400px|Book Creator Manager.jpg|alt=Book Creator Manager.jpg]] | [[File:Book Creator Manager (1).jpg|left|400px|Book Creator Manager.jpg|alt=Book Creator Manager.jpg]] | ||
| Line 41: | Line 47: | ||
{| cellspacing="1" cellpadding="1" border="0" style="width: 100%" class="FCK__ShowTableBorders" | {| cellspacing="1" cellpadding="1" border="0" style="width: 100%" class="FCK__ShowTableBorders" | ||
|- | |- | ||
| − | | [[File:Book Creator Manager Garbage.jpg|left| | + | | [[File:Book Creator Manager Garbage.jpg|left|300px|Book Creator Manager Garbage.jpg|alt=Book Creator Manager Garbage.jpg]] |
| − | | [[File:Book Creator Manager show.jpg|left| | + | | [[File:Book Creator Manager show.jpg|left|300px|Book Creator Manager show.jpg|alt=Book Creator Manager show.jpg]] |
|} | |} | ||
| Line 52: | Line 58: | ||
5. When you are done, click on "download". After a few seconds, the follwing page will appear: | 5. When you are done, click on "download". After a few seconds, the follwing page will appear: | ||
| + | |||
| + | <br/> | ||
[[File:Book Creator Rendering.jpg|left|500px|Book Creator Rendering.jpg|alt=Book Creator Rendering.jpg]]<br/> | [[File:Book Creator Rendering.jpg|left|500px|Book Creator Rendering.jpg|alt=Book Creator Rendering.jpg]]<br/> | ||
Revision as of 08:00, 14 July 2016
With the book creator you can create a book containing various wiki articles of your choice. You can then export this book in different formats (for example PDF or ODF). The book creator not only allows you to download various wiki articles in one document but also includes automatic table of content, bibliography as well as list of contributors.
1. To start the book creator, click on "Print/export" in the left sidebar. In the drop down menu which opens up, click on "create a book". The following page will appear:
2. Click on the green box which says "Start book creator".
You will be redirected to the last page you visited, however, a new box appears at the top of the page:
3. Now you can browse through energypedia.info and whenever you find an article that you want to add to your book, click on "Add this page to your book" in the book creator box at the top of the page. If you accidentally added an article to your book, you can remove it by clicking "remove this page from my book" in the box at the top of the page.
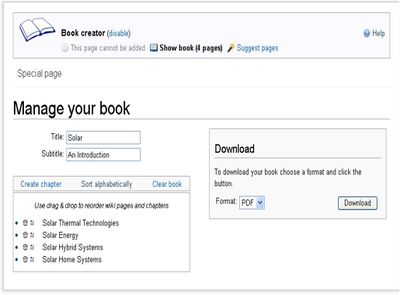
4. Once you have chosen all the pages you want to add to your book, click on "show book" in the box at the top of the page. The following page opens:
- Here you can fill in the title as well as the subtitle of your book, which will appear on the front page of your document.
- Furthermore this is where you can change the order in which the selected articles will appear in your book: use drag and drop to reorder the articles or click "sort alphabetically" if you wish your articles to appear in an alphabetic order.
- By clicking "create chapter", you can add chapters, which can also be reordered by drag and drop.
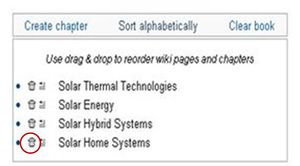
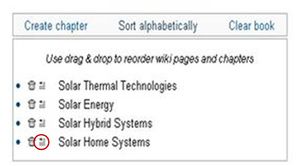
- Clicking on the garbage bin symbol next to the individual page names (see below left) allows you to delete selected articles from your book and clicking the text symbol (see below right) allows you to return to the original article pages.
- Also, you can select whether you want to create a PDF or a ODT document by clicking on the drop down menu in the box "download".
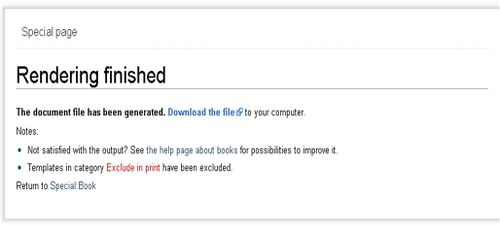
5. When you are done, click on "download". After a few seconds, the follwing page will appear:
6. Click on the link "download the file". The book will be downloaded and opened up automatically.


