Difference between revisions of "Insert Pictures or Documents"
From energypedia
***** (***** | *****) m (Ranisha moved page Help:Insert Pictures or Documents to Insert Pictures or Documents without leaving a redirect) |
***** (***** | *****) m |
||
| Line 1: | Line 1: | ||
| + | |||
{{template:Tabs-1 | {{template:Tabs-1 | ||
|Energypedia_Community:_Help|Back to the Help Portal | |Energypedia_Community:_Help|Back to the Help Portal | ||
| | | | ||
}} | }} | ||
| + | |||
== Inserting Images == | == Inserting Images == | ||
| Line 11: | Line 13: | ||
1. Before you can insert any document or picture in your article '''you need to upload the corresponding file''' into the wiki! | 1. Before you can insert any document or picture in your article '''you need to upload the corresponding file''' into the wiki! | ||
| − | + | For instructions on how to upload pictures/documents to energypedia, please see this article: "[[Upload Pictures and Documents|Uploading Pictures and Documents]]" | |
| − | <br/>2. | + | <br/>2. To insert a picture, click on the "Image" option in the edit toolbar. |
[[File:Bild laden.JPG|border|600px|Inserting files or documents|alt=Inserting files or documents]] | [[File:Bild laden.JPG|border|600px|Inserting files or documents|alt=Inserting files or documents]] | ||
<div style="clear: both"></div> | <div style="clear: both"></div> | ||
| − | <br/>3. For the option, " | + | <br/>3. A pop-up menu will appear. For the option, "Image file name" , type in the name of the file you want to use. |
[[File:Bild eigenschaften.JPG|none|428px|Choose image|alt=Choose image]]<br/> | [[File:Bild eigenschaften.JPG|none|428px|Choose image|alt=Choose image]]<br/> | ||
<div style="clear: both"></div> | <div style="clear: both"></div> | ||
| − | *The option "Alignment" provides the opportunity to put the image right, left or center of the article. | + | *The option "'''LInk image to a Wiki page or URL'''", allows you to direct your audience to a particular wiki page or a website when they click on the picture. For linking to a wiki article, simply type in the name of the article and for linking to an external website, type in the entire URL including htttp: |
| − | * | + | *“Caption” allows you to add relevant caption to your picture. The caption will be displayed below the file when you choose "Special type" -> frame or thumbnail. If you choose "Special type" -> border, then the caption will only be shown when you hover over the picture. |
| + | *The option "Alignment" provides the opportunity to put the image right, left or center of the article.To prevent text from floating around the pictures, use '''center''' alignment. | ||
| + | *The option "width" allows you to determine the width of the picture. Please do not use more than 800px as it will result in skewed page.<span style="font-size: 13.6px; background-color: rgb(255, 255, 255);">The</span><span style="font-size: 13.6px; background-color: rgb(255, 255, 255);"> <span style="font-size: 13.6px; background-color: rgb(255, 255, 255);">"Special type" -> frame</span> option does not allow you to adjust the picture size.</span> | ||
| − | <br/>4. Click | + | <br/>4. Click OK. The graph will now appear in the edited text. |
| − | 5. To change a | + | 5. To change a graph´s height or alignment, scroll over the picture or filename, then right click and choose <u>"Image Properties"</u>. |
[[File:Bild ändern.JPG|none|350px|Image Properties|alt=Image Properties]] | [[File:Bild ändern.JPG|none|350px|Image Properties|alt=Image Properties]] | ||
<br/><div style="clear: both"></div> | <br/><div style="clear: both"></div> | ||
| − | 6. To remove a graph from the article | + | 6. To remove a graph from the article, select the graph and press delete. |
| + | |||
| + | <br/> | ||
<br/> | <br/> | ||
| Line 36: | Line 42: | ||
== Inserting File == | == Inserting File == | ||
| − | *For inserting file as a picture/link, see [[ | + | *For inserting file as a picture/link, see [[Insert File as Picture / Link|Insert File as Picture / Link]] |
<br/> | <br/> | ||
{{Help Magic Words}} | {{Help Magic Words}} | ||
| − | |||
Revision as of 11:15, 20 March 2017
Inserting Images
Instructions
1. Before you can insert any document or picture in your article you need to upload the corresponding file into the wiki!
For instructions on how to upload pictures/documents to energypedia, please see this article: "Uploading Pictures and Documents"
2. To insert a picture, click on the "Image" option in the edit toolbar.
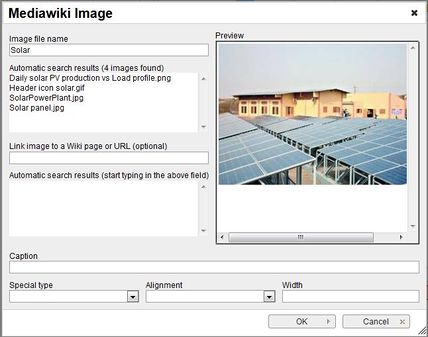
3. A pop-up menu will appear. For the option, "Image file name" , type in the name of the file you want to use.
- The option "LInk image to a Wiki page or URL", allows you to direct your audience to a particular wiki page or a website when they click on the picture. For linking to a wiki article, simply type in the name of the article and for linking to an external website, type in the entire URL including htttp:
- “Caption” allows you to add relevant caption to your picture. The caption will be displayed below the file when you choose "Special type" -> frame or thumbnail. If you choose "Special type" -> border, then the caption will only be shown when you hover over the picture.
- The option "Alignment" provides the opportunity to put the image right, left or center of the article.To prevent text from floating around the pictures, use center alignment.
- The option "width" allows you to determine the width of the picture. Please do not use more than 800px as it will result in skewed page.The "Special type" -> frame option does not allow you to adjust the picture size.
4. Click OK. The graph will now appear in the edited text.
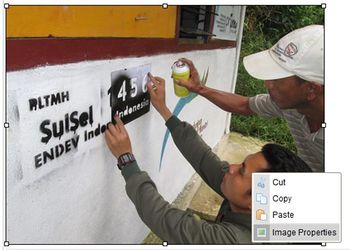
5. To change a graph´s height or alignment, scroll over the picture or filename, then right click and choose "Image Properties".
6. To remove a graph from the article, select the graph and press delete.
Inserting File
- For inserting file as a picture/link, see Insert File as Picture / Link


