Difference between revisions of "Adicionar fotos ou documentos"
***** (***** | *****) m |
***** (***** | *****) m |
||
| Line 1: | Line 1: | ||
| − | |||
| + | |||
| + | |||
| + | You can upload pictures and documents to the gallery in order to link them into an article. | ||
However, always keep in mind that [[Main Page|energypedia]] is not a file sharing / storing system. Also, please make sure to [[Insert References|quote and reference correctly]] in order to avoid plagiarism. Regarding file size, a single file of maximum 512 MB file can be uploaded on energypedia. Also the file you are uploading '''should not''' begin with "IMG'''.''' | However, always keep in mind that [[Main Page|energypedia]] is not a file sharing / storing system. Also, please make sure to [[Insert References|quote and reference correctly]] in order to avoid plagiarism. Regarding file size, a single file of maximum 512 MB file can be uploaded on energypedia. Also the file you are uploading '''should not''' begin with "IMG'''.''' | ||
= Instruções = | = Instruções = | ||
| − | 1. Click on the option ''' | + | 1. Click on the option '''Carregar ficheiro''' in the "wrench" icon on the bottom left corner |
[[File:Cargarficheiro.png]] | [[File:Cargarficheiro.png]] | ||
| Line 14: | Line 16: | ||
[[File:Picture tutorial.png]] | [[File:Picture tutorial.png]] | ||
| + | |||
| Line 20: | Line 23: | ||
| − | [[File:Upload wizard pt.png]] | + | [[File:Upload wizard pt.png|alt=|border]] |
4. Add the appropriate source and author, as well as the license. | 4. Add the appropriate source and author, as well as the license. | ||
| − | + | [[File:Upload wizard pt2.png|border|909x909px]] | |
5. Add a '''meaningful''' title (see below for instructions), add description, date, and '''categories''', and click on "Publish". | 5. Add a '''meaningful''' title (see below for instructions), add description, date, and '''categories''', and click on "Publish". | ||
| Line 30: | Line 33: | ||
To see a list of categories used on energypedia, click '''[[Special:Categories|here]]'''. | To see a list of categories used on energypedia, click '''[[Special:Categories|here]]'''. | ||
| − | + | [[File:Upload wizard pt3.png|border]] | |
6. The uploaded file can now be put into any article: [[Insert Pictures or Documents]] | 6. The uploaded file can now be put into any article: [[Insert Pictures or Documents]] | ||
| Line 36: | Line 39: | ||
== Find the Uploaded Document == | == Find the Uploaded Document == | ||
| − | * To find the uploaded file, type '''File:Name of the File''' in the search bar. | + | * To find the uploaded file, type '''File:''' followed by the '''Name of the File''' in the search bar. |
| − | |||
== Name the Document == | == Name the Document == | ||
| Line 55: | Line 57: | ||
== Upload a New Version of the File == | == Upload a New Version of the File == | ||
| − | You can upload a new version of the file without uploading it from scratch. To upload a new version, please follow | + | You can upload a new version of the file without uploading it from scratch. To upload a new version, please follow these instructions: |
* Go to the old file and under File history, click on "Upload a new version of this file". | * Go to the old file and under File history, click on "Upload a new version of this file". | ||
| Line 62: | Line 64: | ||
* | * | ||
| − | + | [[File:Update file.png|border]] | |
| − | |||
| − | |||
| − | |||
| − | |||
| − | |||
| − | |||
| − | |||
| − | |||
| − | |||
| − | |||
| − | |||
| − | |||
| − | |||
| − | |||
| − | |||
| − | |||
| − | |||
| − | |||
| − | |||
| − | |||
| − | |||
| − | |||
| − | |||
| − | |||
| − | |||
Revision as of 13:08, 7 January 2022
You can upload pictures and documents to the gallery in order to link them into an article.
However, always keep in mind that energypedia is not a file sharing / storing system. Also, please make sure to quote and reference correctly in order to avoid plagiarism. Regarding file size, a single file of maximum 512 MB file can be uploaded on energypedia. Also the file you are uploading should not begin with "IMG.
Instruções
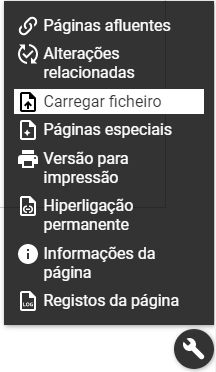
1. Click on the option Carregar ficheiro in the "wrench" icon on the bottom left corner
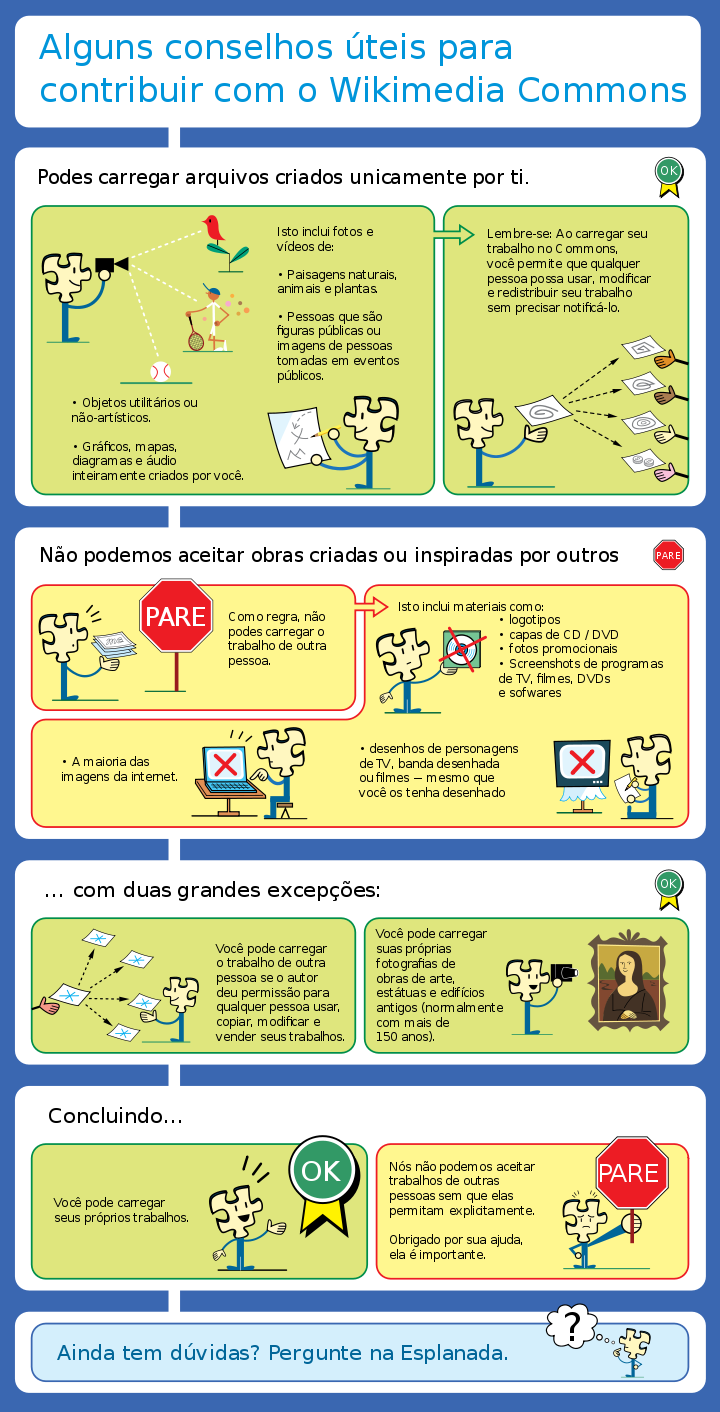
2. Please read these given rules and click on "Next" at the bottom!
3. Choose the file you want to upload by clicking on "Escolha ficheiros multimédia para partilhar".
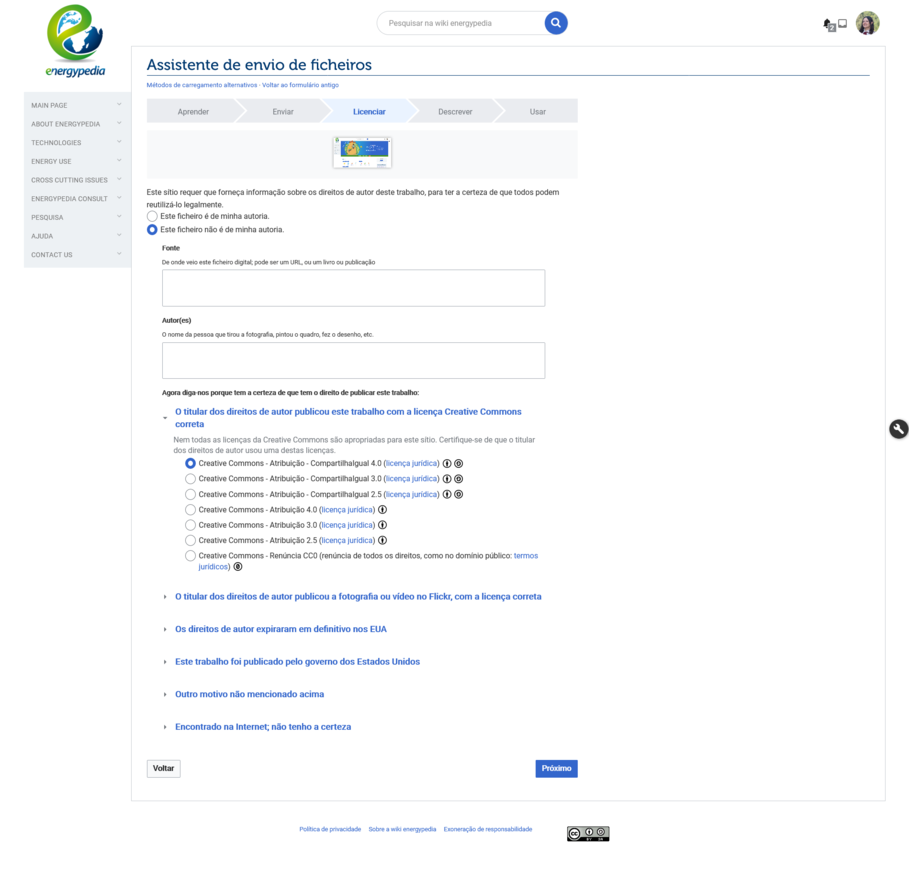
4. Add the appropriate source and author, as well as the license.
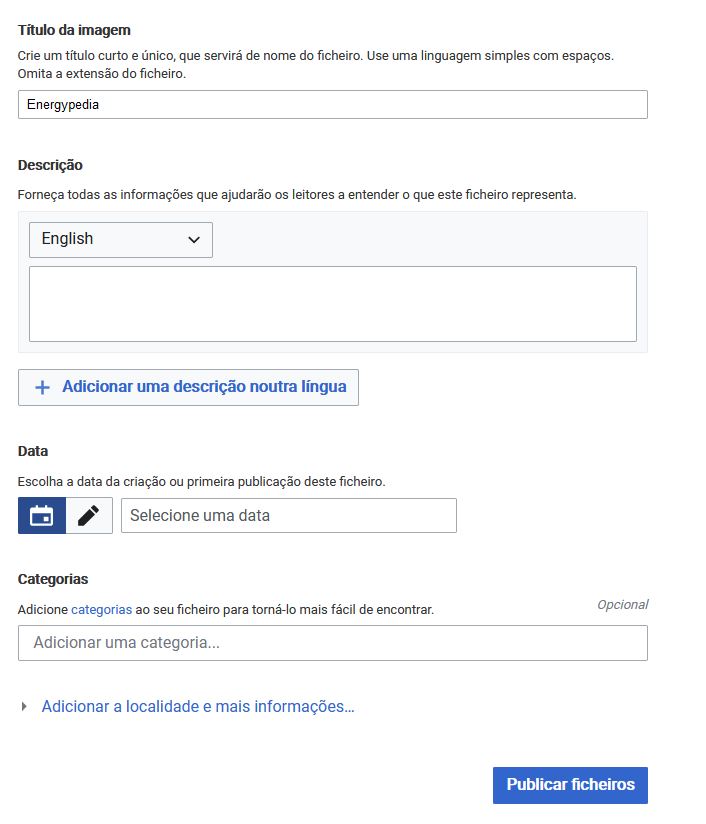
5. Add a meaningful title (see below for instructions), add description, date, and categories, and click on "Publish".
To see a list of categories used on energypedia, click here.
6. The uploaded file can now be put into any article: Insert Pictures or Documents
Find the Uploaded Document
- To find the uploaded file, type File: followed by the Name of the File in the search bar.
Name the Document
Please follow the following standard for naming the uploaded document:
- Title_ (author/organisation)_Year (It is optional to add the name of the author, however the author has to be mentioned in the description box)
For example:
- A Discussion of Solar Home Systems in Developing Countries_Kristjansdottir_2003
Categorize the Document
Files should be categorized to make them better searchable and accessible. For example, technology, country, would be helpful categories.
To see a list of categories used on energypedia, click here.
Upload a New Version of the File
You can upload a new version of the file without uploading it from scratch. To upload a new version, please follow these instructions:
- Go to the old file and under File history, click on "Upload a new version of this file".
- Follow the instructions to upload a new version. The new version will automatically appear in all places where the old file was linked.

